
Peppermint 3D Letter | Step-by-step tutorial for beginners 🍬
Dec 18, 2023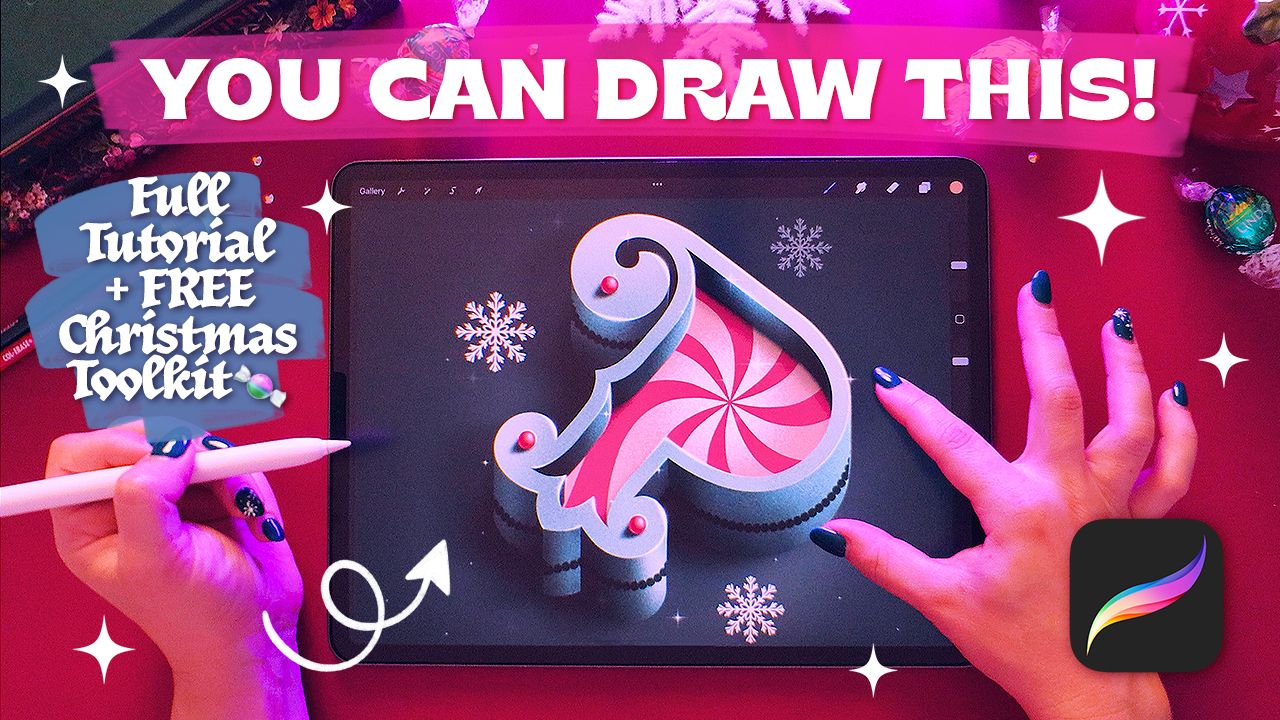
Hey there! As we embrace the holiday season, I wanted to share a step-by-step tutorial on how to create this cute Christmas-themed lettering art using Procreate. Join me as I walk you through the steps to craft your own festive masterpiece.
Step 1: Accessing Your Free Christmas Lettering Toolkit (Download your FREE toolkit ✨)
First things first, let's grab your FREE Christmas lettering toolkit. This toolkit includes 12 Procreate brushes, a colour palette, and a ready-to-use template.

Step 2: Setting Up the Canvas
- Create a new canvas of 3,000 by 3,000 pixels, and use the cream colour from the provided palette as your background (we will change this later but it will help create contrast when drawing the main shape).
- Import your letter P template (or draw your own letterform) and place it on an angle. I played around with angles here, by using Procreate's distort option.
Step 3: Adding Depth and Dimension
- To create your 3D effect, duplicate your shape (Letter P Template), move the duplicate behind your main shape and slide it down, connect all the edges and fill it with a solid dark colour (this is the 3D Effect).

- Create a new layer on top of the Letter P Template and fill in the centre of your top shape with a solid colour (I used pink), and move that shape behind the Letter P Template and down then connect the edges and erase the non-visible parts.

- To create the cast shadow, duplicate the 3D Effect, lower the opacity of the layer (about 40%), move it to the side (away from your chosen light source) and connect the edges.
- Then go to Adjustments and add around 30% of Motion Blur and about 10% of Gaussian Blur.
- Using the Shading Brush with a dark green colour, add some shadows at the base of your letterform. I suggest lowering the opacity of your brush to keep this shadow subtle.

- Create a new layer on top of your 3D Effect and make it a Clipping Mask. Using the Shading Brush with a light green colour, add some highlights where your light source would naturally hit (tip: you can make your highlight more realistic by using an eraser to create sharp lines).
- Using the same method on a new layer, you can now add some shadows. This time, use the dark green colour and change the blending mode of the layer to Multiply.
- Emphasize your highlights by repeating the previous step but this time use a light cream colour.
- Now that my main shape is done, I can change the background to a dark green colour to make the letter pop!

Step 4: Designing the Peppermint Pattern
- Now let's design your perfect peppermint pattern. In a separate canvas of the same size (3,000 by 3,000 pixels) go to Actions, toggle on the Drawing Guide, and click Edit Drawing Guide. Under Symmetry, click Options, select Radial and click Done.
- Using the Vector Pen brush with a red colour, draw a straight line to the middle of your canvas and fill it with red.
- Duplicate this cross shape and rotate it 45 degrees. Make sure you select the Uniform option if you need to change the size of your shape to fill in the entire canvas.
- Merge your 2 layers together and deactivate the Drawing Assist. With the Liquify tool, select Twirl Right, or Twirl Left, to create your spiralling effect (play with the size to create your perfect peppermint pattern).

- Select the layer of your new swirl shape and click Copy, then back on your initial artwork, select the inside shape and click Actions, Add, Paste. Click on your newly pasted layer, and create a clipping mask, and reposition your peppermint pattern in the middle of your letterform.
- Use the Shading Brush with a dark green colour and add some shadows on the edges of your peppermint effect (imagine that the dark green of the inside 3D effect would cast some shadow on your inside shape).
- To add some dimension to the peppermint shape, create a new layer just below the peppermint pattern (it should create a clipping mask automatically). Change the blending mode to Add and grab the Shading Brush with a light beige colour and add some highlight to the centre of your swirl.
- Create a new layer above the highlights and shadows of your 3D Effect and make it a clipping mask and change the blending mode to Multiply. Use the Dotted Line brush with a dark green colour and go around the edges of your letterform (tip: use the Liquify tool set to Push to make sure the dotted line wraps around your shape seamlessly). You might have to erase overlapping dots.
- Create a new layer on top of the Letter P Template, make it a clipping mask, and grab the Shading Brush with a dark green colour to add a bit of a grainy effect on top of your letter. Repeat this step with the light cream colour as well.

Step 5: Adding Decorative Elements
- Create a new layer on top of everything else and using the Vector Pen brush with a bright pink, draw a perfect circle (hold and tap with one finger).
- Create a clipping mask above that shape, change the blending mode to Multiply, and use the Shading Brush to draw some shadows.
- Using the same technique, with the blending mode set to Add, add some highlights.
- Create your cast shadow by using the dark green colour and the Shading Brush.
- Group the 4 layers together (the round shape, the shadow, the highlight, and the cast shadow) so you can now copy and paste your pearl around your letter.

- Create a new layer on top of everything else and change the blending mode to Add. Use the Highlight Pen with a light cream colour and go around the edges of your letterform.
- To add some texture and realism to the background, you can add highlights around the letterform and shadows around the edges of the canvas.
- With the Fairy Dust brush, add some random sparkles around your artwork, and use the Snowflake brush to add some random snowflakes (tip: use different sizes and opacities to make your snowflakes look more realistic).

Step 6: Final Adjustments
- To create a more cohesive look, add a new layer on top of everything else and fill in the entire canvas with one colour (I used the bright orange colour from the palette). Change the blending mode to Linear Burn and lower the opacity to 15%.
- To add the very last adjustments, you need to merge all of your layers together, so make sure to create a copy of your artwork! Then go to Adjustments, Noise and add about 5%. Then go to Adjustments, Chromatic Aberration and add about 5% as well.
And you're done! This would be a cute artwork to give to someone for a one-of-a-kind present this holiday season. 🎁📮

I hope you enjoy this tutorial and that it helps you get in the Christmas spirit! Feel free to add your personal touch to this artwork and don't forget to tag me if you recreate this tutorial! 👉🏽 @aureliemaron.
Happy holidays,

Enjoy learning with me? Check out all my Procreate courses!


